Wednesday, December 26, 2012
Wednesday, November 14, 2012
Marine dress
Before I start, Happy Diwali to my lovely friends. Today's festival of light marks a new year, and even more fabulous one for all you people ahead.
Inspired by the super cute purple dress by Crissi (next post below), I decided to finally do my own little official dress. I'd never did a proper cut out dress. It was always taking the easy way out, attaching some fabric to a stretchy material for the boob part. I thought I should grow up and embark on the real stuff. So, no pattern in mind or hand, I drew out a simple tank for the top, double layered the inside and out so I'll get nice flat seams. The secret is to snip the curve areas. The bottom is no secret, just a long rectangle. 2 rows of 1 inch wide elastic holds the center part together.
I'm partial towards marine styles, so 2 rows of white grosgrain ribbon trims the bottom. ;+) Love how it turned out, fits great. No zipper coz it can be pulled over. Easy. 7 hours of easy, that is. Now I wanna make some more. Certainly more rewarding than buying one off the shelves.
I leave you with a lovely song.
Thursday, November 08, 2012
about Crissi Cochrane
discovered this amazing & adorable indie singer songwriter, who also incidentally makes really cute dresses! (thats how i found her anyways, i was trawling for craftyness.) Her Drive all night vid is right above. Hit play, you'll fall in love with her sweet voice and how calm her music makes you feel. :+) find her deets at www.crissicochrane.com
Love her Battenburg And Berries Dress. vintage chic, no?
just thought i'd share.
Saturday, July 28, 2012
Hello Shorty!
Hello blog world! long time..... almost a year to be exact. time flies when you're consumed by the corporate world. yes, unfortunately to feed myself independently i needed to do the unthinkable. so now i'm some accountant slaving away her life for pennies. life is generally not as miserable - i surround myself with books and crafts, secretly sewing pieces of clothing whenever the weekends come along. this particular weekend is rather fruitful. i had been thinking of making summer shorts for a while and i couldn't find a pair for a decent price in the stores, so i thought, heck, i'll make one. so here's a tiny tute to share my tiny joy.
 |
| Hello Shorty! |
Bit more girly than expected. not necessarily a bad thing! It looks like boudoir short, but its really a lot wearable in real life. change the fabric / embellishments to create a different look.
You'll need your fav shorts for this project, if you don't have a pattern already. its rather easy to make a pattern and very useful for simple adjustments for future projects.
You'll also need paper for your patter, ruler, pencil, chalk, scissors, thread, sewing machine, embellishments & of course fabric for your short. depending on size, i recommend about 1.5 yards/meters for safety. you'll also need a bit of time. I took about 6 hours, with the pattern, decisions and embellishments. some amount of coffee recommended. ;+)
1) Pattern.
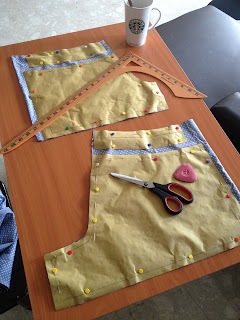
Fold your fav short in half to get both the front and back pattern. i recommend a non-stretchy short if you're using a non-stretchy fabric. the pattern is generally a rectangular piece with an extended piece at the bottom so there's like a curve "L" at the side. See snapshort for elaboration. the front piece ussually has a shorter L, the back has an extended L at the crotch, to make room for my um, ahem, ample bottom. :P i.e., the larger the bum, the longer the L has to extend out. i left more space at the side seams for luck and i kinda wanted to have the bottom leg part to be slightly wider.
2) Sew the crotch area. Front side to back side.
3) Sew the side seams. Repeat for other leg.
4) Flip one piece inside out and place it in the other pant leg. line them together and sew the inseam. this will ensure a smooth curve around your crotch area.
5) Flip it inside out and you have your basic shorts! All you have to do is finish up the top and bottom.
6) I stitched around the seam to ensure the seams are strong enough to withstand machine washing.
7) Waistband.
Cut a length of fabric, long enough to go round the top with a bit to spare for the seam and wide enough to fold over. Pin it along the top of the short, good sides together, and sew around the top, leaving a space for your elastic to run through.
8) Insert elastic.
Cut a length of 1 inch elastic (it can be wider, just adjust the width of the waistband to accommodate the elastic.) comfy enough to go round your low waist area, cut and insert it into the waistband of the short. pull it through, join the ends of the elastic together by sewing a zigzag stitch along. adjust the elastic until it fits in nicely then sew the opening.
9) Pockets
Feel free to skip this step if you don't need them. i personally adore them to store objects i often lose. or they're perfect for your hands. ;+) think about the size, make sure it fits your palm, how big and deep you want them to be, mine was about 5.5 inches all round. also think about where you want them. try your shorts on and figure that out.
10) Round edge
I like to use bowls and plates for the perfect curve. ;+)
11) Chalk the edges.
12) Sew the edges leaving about 2 inches space to turn the pockets out. Cut the edges for a smooth finish. iron the pockets and sew them on your shorts. embellish them if you like. i used ribbons and vintage lace for a girly touch.
13) Hem / sew bottom leg portions and you're done! finished short is the one on top. ;+)
It looks soooooo cute on i might make a couple more. the bottom leg part is a bit wide so i might take it in a bit next round. i'll need a grey linen slightly longer one for work. we'll see.
hope you guys like it and enjoy short-ing! :D taaaa!
Subscribe to:
Posts (Atom)


